
Perception starts at Level 1. As the Perception Tree is leveled up, the headshot damage and dismember chance of rifles, explosives, and spears is increased. Headshot damage starts at 200%, and each level increases it by +10% (+15% for levels 9 and 10), up to a maximum of +300% at level 10. Dismemberment chance starts at 5%, and each level increases it by +5%, up to a maximum of 50% at level 10.
As Perception level increases, so does the amount of skillpoints required. Levels 2-5 cost one point, levels 6-8 cost two, and levels 9-10 cost three. Perception can be increased by one level for free with Shades, an uncommon clothing item.
Perception - Combat Perks

Dead Eye
Rank
Damage
Reload Speed
Handling
Stamina Drain
Special Ability
Crafting Unlocks
Crafting Quality
Perception Level Requirement
1
+10%
+10%
N/A
N/A
N/A
Hunting Rifle
2
1
2
+20%
+15%
+20%
N/A
N/A
N/A
3
3
3
+30%
+20%
+32%
-10%
Killstreak - Up to +30% Damage
N/A
4
5
4
+40%
+25%
+45%
-20%
Killstreak - Up to +40% Damage
N/A
5
7
5
+50%
+30%
+60%
-30%
Killstreak - Up to +50% Damage
N/A
5
10
Killstreak Ability - Precision is power! The first kill with rifles grants a +10%/+20%/+30% damage bonus, with each subsequent kill giving you an additional +10% damage bonus, up to a maximum of 3 stacks. The bonus is lost after a 5s duration, and this timer is reset upon each new kill.
Handling - Increases the rate at which your accuracy stabilizes (reaches its highest value) before and after firing.

Demolitions Expert
- EXPLOOOSIOONS! Improves the combat potential of all explosives, such as grenades, pipe bombs, and the rocket launcher. Each level increases damage, reload speed, handling, stun chance, and dismemberment chance, while unlocking several crafting recipes and improving quality.
Rank
Damage
Reload Speed
Handling
Stun Chance
Cripple Chance
Dismemberment Chance
Crafting Unlocks
Crafting Quality
Perception Level Requirement
1
+10%
+15%
+10%
+50%
N/A
+5%
Pipe Bombs, Plate Mines, and Cooking Pot Mines
2
1
2
+20%
+20%
+20%
100%
N/A
+10%
Dynamite and Hubcap Mines
3
3
3
+30%
+25%
+30%
100%
+33%
+20%
Grenades and Gunpowder Stacks
4
5
4
+40%
+30%
+40%
100%
+66%
+30%
HE Rockets and Frag Rockets
5
7
5
+50%
+35%
+50%
100% and Longer Stuns
+66%
+45%
Contact Grenades, Timed Charges, and Air Filter Mines
5
10
Stun Chance - Increases the chance of stumbling an enemy, lowering their attack and movement speed. Stuns gradually wear off overtime, and grant enemies stun resistance after its duration.
Cripple Chance - Increases the odds of maiming an enemy, greatly decreasing their movement speed for a short duration. Especially effective on feral and irradiated zombies, who sprint as their default speed.
Dismember Chance - Increases the odds of severing a limb on an enemy. Decapitations are instant kills. Armless zombies have decreased attack strength and range. Legless zombies are slowed to a crawl. Tougher enemies have dismember resistance. The dismember chance from the Perception Tree itself and the Demolitions Expert perks stack, totaling to a maximum of 95% dismember chance on weak zombies.
Handling - Increases the rate at which your accuracy stabilizes (reaches its highest value) before and after firing.

Javelin Master
- Sharp sticks and metal pokeys. Increases the melee damage and thrown velocity of spears, as well as their crafted quality. Does not increase thrown spear damage!
Rank
Damage
Velocity/Range
Crafting Unlocks
Crafting Quality
Perception Level Requirement
1
+10%
+10%
Iron Spear
2
1
2
+20%
+20%
N/A
3
3
3
+30%
+30%
N/A
4
5
4
+40%
+40%
N/A
5
7
5
+50%
+50%
N/A
5
10

The Penetrator
- Out the slim end. Applies armor piercing on all firearms and spears. Improves the effectiveness of Armor Piercing rounds. The Target Penetration bonuses will only work if you are using AP 7.62 ammo!
Rank
Armor Pierce
Penetration
Targets
Perception Level Requirement
1
+15%
Up to 250HP
Up to 1
1
2
+25%
Up to 500HP
Up to 2
4
3
+35%
Up to 750HP
Up to 3
6
4
+35%
Up to 1000HP
Up to 4
8
Target Penetration - By default, an Armor Piercing round can penetrate one enemy with a maximum health of 250HP. After penetration, the bullet will continue its line of fire, dealing the same amount of damage it normally would. Each rank upgrade will increase the number of targets an AP round can go through, as well as the total HP absorbed.
Bug - As of now, target HP does not matter. A bullet will penetrate through any enemy, no matter their health. The number of maximum targets does still matter.
Perception - Looting/Tracking Perks

Lock Picking
- A thief's best friend. Unlocks lockpick crafting and improves lockpicking overall.
Rank
Speed
Break Chance
Crafting Unlocks
Perception Level Required
1
+20%
-10%
Lockpicks
1
2
+40%
-20%
N/A
4
3
+60%
-30%
N/A
7
Lockpicking - By holding E on a locked container, you can select the option to Lockpick the container. Lockpicking takes 15-20s (depending on the container size), and has a chance to break a lockpick.

The Infiltrator
- The solid choice for crooks looking to stay in one piece. Decreases damage taken from landmines, and increases the detonation delay of traps. Comes in handy for points of interest and creating your own traps.
Rank
Mine Damage
Trigger Delay
Special Ability
Perception Level Requirement
1
-20%
+0.5s
N/A
1
2
-35%
+1.0s
N/A
4
3
-50%
+2.0s
Pick up Landmines
7
Landmines are Mine - You can pick up landmines that were placed by you, or ones that were generated by points of interest. Very useful if you intend on laying traps.

Animal Tracker
- Hunting wabbits. Grants the ability to track animals. After crouching for three seconds, the perk activates for 20 seconds, and all nearby animals are displayed on the compass. Crouching again refreshes the timer. Each new rank keeps the previous rank's benefits.
Rank
Prey
Predators
Perception Level Requirement
1
Rabbits and Chickens
Snakes
1
2
Deers and Boars
Wolves and Coyotes
4
3
N/A
Bears and Mountain Lions
7

Lucky Looter
- All that glitters is gold. Improves the quality and speed of looting. Loot bonus affects the gamestage loot for all containers you open. You will tend to find higher tier and higher quality items.
Rank
Loot Bonus
Looting Speed
Perception Level Requirement
1
+5%
+10%
1
2
+10%
+20%
2
3
+15%
+40%
3
4
+20%
+60%
5
5
+25%
+80%
7

Treasure Hunter
- Where the hell is that damn chest?! Grants a heightened ability to find treasure chests, as well as improving the loot inside of them.
Rank
Blocks to Dig
Loot Bonus
Perception Level Required
1
7
+10%
1
2
5
+20%
4
3
3
+30%
7
Diggy Diggy - By default, once the player removes 10 blocks within a treasure chest, the given radius of the chest decreases by 1 meter. This helps determine the precise location of a chest. The Treasure Hunter perk decreases the number of blocks required to decrease the radius.

Salvage Operations
- Shy cars are patched. Again. Increases the efficiency and resource gain of salvaging with wrenches, ratchets, and impact drivers. Unlocks salvage tool crafting and improves their quality with each rank.
Rank
Block Damage
Speed
Resource Gain
Crafting Unlocks
Crafting Quality
Perception Level Required
1
+10%
+20%
+20%
Wrench
2
1
2
+20%
+40%
+20%
N/A
3
2
3
+30%
+60%
+30%
N/A
4
3
4
+40%
+80%
+40%
N/A
5
5
5
+50%
+100%
+50%
N/A
5
7
Salvaging Basics - Mechanical and electrical devices such as cars, lights, panels, machine parts, and monitors can be salvaged using wrenches, ratchets, or impact drivers. You will know when an object is salvagable by a unique tool animation. Depending on what you salvage, you can find mechanical parts, electrical parts, forged iron and steel, engines, batteries, and more.
Perception - Weapons
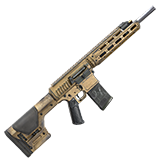
Rifles
- The Perceptionist's main weapon of choice are high-caliber, long range sniper rifles. Rifles take 7.62 ammunition, and deal some of the highest damage per shot in the game. Rifles are very accurate when aimed, but are less wielded when hip fired.
Hunting Rifle
- Unlocked: Dead Eye Rank 1 or Schematic
- Tier 1
- Stats: 52-96 Damage, 1 Clip Size, 114-126 Rounds/min (Fast), 56-84m Effective Range, Very Low Hipfire Accuracy, High Aim Accuracy, 136-384 Durability, 2.7s Reload
- The Hunting Rifle is a fairly common weapon, that can be found in early game loot. While its damage is sufficient enough to kill most animals and zombies in one headshot, it only holds one bullet, and has a fairly long reload.
Marksman Rifle
- Unlocked: Schematic Only
- Tier 2
- Stats: 50-91 Damage, 4-6 Mag Size, 142-157 Rounds/min (Fast), 48-72m Effective Range, Very Low Hipfire Accuracy, High Aim Accuracy, 160-480 Durability, 2.5s Reload
- The Marksman Rifle is a considerable improvement. Though the Hunting Rifle has a greater average damage and range, the Marksman is superior in its fire rate, magazine size, and moddability.

Sniper Rifle
- Unlocked: Schematic Only
- Tier 3
- Stats: 54-99 Damage, 11-13 Mag Size, 133-147 Rounds/min (Fast), 56-84m Effective Range, Very Low Hipfire Accuracy, Very High Aim Accuracy, 200-600 Durability, 2.5s Reload
- The Sniper Rifle was added in the Alpha 19 Experimental. As of its current stats, it is the most powerful rifle in the game, sporting an even larger clip size and massive damage, alongside a fair reload time. Keep those heads rolling!
Explosives
- The Perceptionist also takes advantage of explosive weaponry such as grenades, rocket launchers, and landmines. Explosives are excellent at clearing small hordes of enemies. Thrown explosives can be lit/activated via M2, and thrown with M1. The longer M1 is held, the further the explosive will travel.
Molotov Cocktail
- Unlocked: By default
- Stats: 250 Fire Damage, 16s Burn Time, 3m Radius
- While not exactly an explosive, this thrown Molotov will ignite enemies in a small radius. If you're lucky enough to find some gas and oil, consider making a Molotov or two.

Pipe Bomb
- Unlocked: Demolitions Expert Rank 1 or Schematic
- Stats: 230 Explosion Damage, 5 Block Damage, 5m Radius, 4s Fuse Time
- Cheap, efficient, explosive. Pipe bombs will do the trick for most scenarios, but compared to other explosives, they aren't the greatest in damage. Do not light a pipe bomb and hold onto it. You will explode.

Dynamite
- Unlocked: Demolitions Expert Rank 2 or Schematic
- Stats: 500 Explosion Damage, 3000 Block Damage, 6m Radius, 4s Fuse Time
- Out of all the thrown explosives, Dynamite does the highest damage, with a larger explosion radius and a normal fuse time. While its effective in blasting enemies, its even more effective in blasting terrain! If you plan on using dynamite, make sure you use it in a spot you don't mind being blasted to schmithereens. Like the pipe bomb, you will explode if you hold it out for too long.

Grenade
- Unlocked: Demolitions Expert Rank 3 or Schematic
- Stats: 310 Explosion Damage, 10 Block Damage, 5m Radius, 3s Fuse Time
- One of the most well-wounded explosives, grenades deal great damage in a good radius. Unlike pipe bombs, you can pull the pin on a grenade and it will never explode until thrown.

Contact Grenade
- Unlocked: Demolitions Expert Rank 5 or Schematic
- Stats: 310 Explosion Damage, 10 Block Damage, 5m Radius, No Fuse Time
- Though it has the same stats as the normal grenade, the contact grenade has a unique quirk. When making contact with an enemy or tile, it will explode instantly, making it superior for fast horde clearing.

Timed Charge
- Unlocked: Demolitions Expert Rank 5 or The Great Heist Volume 3
- Stats: 600 Explosion Damage, 3000 Block Damage, 1m Radius, 4s Fuse Time
- While not exactly suitable for combat, the Timed Charge is an explosive device used to bust into safes, vaults, and locked chests. When placed, it activates, and detonates after 4 seconds, applying a massive amount of damage to the block or object it was placed on.
Rocket Launcher
- Unlocked: Schematic Only
- Tier 3
- Stats: 170-310 Impact Damage, 1 Clip Size, 75 Rounds/min (Average), 56-84m Effective Range, 46-54m/s Projectile Speed, Very Low Hipfire Accuracy, High Aim Accuracy, 64-180 Durability, 2.0s Reload
- A beast of a weapon, the Rocket Launcher fires devastating RPGs and decimates anything in its path. The Rocket Launcher is a precision weapon, used to clear hordes or annihilate dangerous enemies. It deals impact damage alongside rocket explosion damage (see Ammunition), and can only hold one shot at a time.

Landmines
- Unlocked: Demolitions Expert Only
- Comes in many shapes and sizes. See Perception - Traps for more.
Spears
- Perceptionists use Spears as their melee weapon. Spears have longer range than other melee weapons, and can be thrown using the Power Attack button (M2). The longer the button is held, the further the spear will travel and the more damage it will do. Spears also have natural armor piercing.
Stone Spear
- Unlocked: By default
- Primitive
- Stats: 10-15 Damage, 39-44 Power Attack, 55 Attacks/min (Average), Long Range, 18.5 Stamina/swing, 36.9 Stamina/P-swing, 60-88 Durability, +20% Armor Piercing
- A caveman classic. Stone spears aren't the best, but they're cheap enough to be crafted in bulk, allowing you to throw several in quick succession. Stone spears deal decent damage, and pierce through armor.

Iron Spear
- Unlocked: Javelin Master Rank 1 or Schematic
- Tier 2
- Stats: 10-19 Damage, 45-54 Power Attack Damage, 55 Attacks/min (Average), Long Range, 20.3 Stamina/swing, 40.6 Stamina/P-swing, 212-423 Durability, +20% Armor Piercing
- A bit more sophistication. The Iron Spear is superior to the Stone Spear, but is rarer to find and costlier to craft.

Steel Spear
- Unlocked: Spear Hunter Volume 2
- Tier 3
- Stats: 15-28 Damage, 68-81 Power Attack Damage, 55 Attacks/min (Average), Long Range, 22.4 Stamina/swing, 44.8 Stamina/P-swing, 317-592 Durability, +31% Armor Piercing
- A deadly blade with a strong bite. The Steel Spear is the best spear in the game, with the highest damage and armor pierce.
Perception - Traps
As a part of their kit, Perception builds have access to crafting explosive traps, known as landmines. They can be crafted by ranking up the perk Demolitions Expert, which is the most efficient way to make landmines. They are very rarely found in loot and trader inventories.
Notes:

- Unlocked: By default
- Stats: 276 Damage, 4m Radius, 0.5s Trigger Delay
- A cute little landmine that blasts anything that steps on it into a pile of meat. Candy Tin Mines can be easily crafted in bulk, but stick out blatantly from the environment. These are best used against zombies in tight corridors, or planting in your base for your friends to step on.

- Unlocked: Demolitions Expert Rank 1
- Stats: 276 Damage, 3m Radius, 0.5s Trigger Delay
- While they seem identical to the Candy Tin Mine, only with less range, these Plate Mines are much harder to avoid by enemies. They cover up an entire block, and can even be painted to blend into the environment. If you want the ideal mine to catch unsuspecting prey, go Plate Mines!

- Unlocked: Demolitions Expert Rank 1
- Stats: 300 Damage, 3m Radius, 0.5s Trigger Delay
- Can you smell what's cookin'? It probably isn't healthy. These Cooking Pot Mines deal a bit more damage than their predecessors. Since they are larger, zombies have higher odds of stepping on them, but players have a higher chance of seeing them. Use them how you will, but I plan on reheating my chili.

- Unlocked: Demolitions Expert Rank 2
- Stats: 450 Damage, 5m Radius, 0.5s Trigger Delay
- The vehicle owner probably won't need these anymore. Hubcap Mines hold a significant damage bonus compared with the previous mines, as well as possessing a larger radius. They are also flat, and stand out less.
- Unlocked: Demolitions Expert Rank 5
- Stats: 690 Damage, 5m Radius, 0.5s Trigger Delay
- By far the deadliest trap in the game, Air Filter Mines deal incredible amounts of damage, and are very hard to escape. Even if you start running when you hear the heart-stopping tick of the mine setting off, you'll still take an immense blast, due to the large damage and radius of this mine. Watch your step!
Notes:
- Landmine damage is applied as splash damage. The further you are from the center of the landmine, the lower the damage you'll take. Beyond the explosion radius (ex. 4m for the Candy Tin Mine), no damage will be taken.
- By default, landmines can not be picked up. You need to rank up the perk The Infiltrator to Rank 3 to do so. The Infiltrator will also decrease landmine damage, by up to -50%.
- Landmines can do block damage, but it is low enough to be considered negligible.
- Shooting or hitting a landmine will destroy it, subsequently blowing it up.
Candy Tin Mine
- Unlocked: By default
- Stats: 276 Damage, 4m Radius, 0.5s Trigger Delay
- A cute little landmine that blasts anything that steps on it into a pile of meat. Candy Tin Mines can be easily crafted in bulk, but stick out blatantly from the environment. These are best used against zombies in tight corridors, or planting in your base for your friends to step on.
Scrap Iron Plate Mine
- Unlocked: Demolitions Expert Rank 1
- Stats: 276 Damage, 3m Radius, 0.5s Trigger Delay
- While they seem identical to the Candy Tin Mine, only with less range, these Plate Mines are much harder to avoid by enemies. They cover up an entire block, and can even be painted to blend into the environment. If you want the ideal mine to catch unsuspecting prey, go Plate Mines!
Cooking Pot Mine
- Unlocked: Demolitions Expert Rank 1
- Stats: 300 Damage, 3m Radius, 0.5s Trigger Delay
- Can you smell what's cookin'? It probably isn't healthy. These Cooking Pot Mines deal a bit more damage than their predecessors. Since they are larger, zombies have higher odds of stepping on them, but players have a higher chance of seeing them. Use them how you will, but I plan on reheating my chili.
Hubcap Mines
- Unlocked: Demolitions Expert Rank 2
- Stats: 450 Damage, 5m Radius, 0.5s Trigger Delay
- The vehicle owner probably won't need these anymore. Hubcap Mines hold a significant damage bonus compared with the previous mines, as well as possessing a larger radius. They are also flat, and stand out less.
Air Filter Mines
- Unlocked: Demolitions Expert Rank 5
- Stats: 690 Damage, 5m Radius, 0.5s Trigger Delay
- By far the deadliest trap in the game, Air Filter Mines deal incredible amounts of damage, and are very hard to escape. Even if you start running when you hear the heart-stopping tick of the mine setting off, you'll still take an immense blast, due to the large damage and radius of this mine. Watch your step!
Perception - Playstyle
Overall Opinion
Difficulty: IntermediateCombat Viability: Great
Survival Viability: Good
Perk Synergy: Agility (see Skilltree Synergy below)
Strategy
- Pick off high-health targets with sniper rifles
- Clear hordes with explosives
- Use spears for close-range targets
- Track and hunt animals for food
- Lockpick containers and get better loot
- Salvage devices for resources
General Playstyle
Perception builds are sighted for long-range combat, picking off enemies at a distance. When in close range, snipers are more difficult to use, especially if equipped with scopes. Instead, spears should be used in close quarters.
Explosives should be used at a careful distance, or used with good timing to allow yourself to escape the blast radius. Grenades can also be used to clear out a small room. For example, if you want to make a tactical entrance, open the door to a room and toss in a grenade. After the explosion, make an entrance and take out any surviving enemies.
Often, Perception builds rely on a strategic approach. For example, when entering a Point of Interest, it's best to first find a vantage point: a high-ground where you can see enemies ahead, while staying out of attack range. While on a vantage point, you can utilize stealth by staying crouched, granting you bonus damage and low detection chance.
On occasion, zombies will be hidden behind cover, or sleeping out of view. Often, you are able to maneuver around your vantage point to get your sights on them. You can also shoot down breakaway doors to reveal zombies.
In the event that zombies are drawn to your vantage point, you can still use this to your advantage! They will often flock directly below you, giving you the critical moment where you can drop a grenade on them. Bombs away!
Optimizing Weapon Usage
Sniper Rifles - Use in mid to long range situations. Rifles are harder to use in close ranges, as they have low accuracy when hipfired, and high accuracy when sighted. If you want to clear out enemies from afar without them noticing, spec yourself for stealth. Equip a silencer, unequip armor, and hide in the shadows. If zombies can't see or hear you, you gain the advantage to pick them off one by one.
Alternatively, you can use a rifle for closer range if you use iron sights or a dot sight. It overall depends on your experience with shooting. You can also watch doorways and chokepoints, especially if you have The Penetrator ranked up, and are using AP 7.62 rounds.
Explosives - Using grenades and explosives to your advantage can help soften up or completely blow away a crowd of zombies. Utilize chokepoints such as doors and hallways, where zombies bunch together tightly, making explosives more viable. You can also throw inactive grenades or bombs on the ground as traps, where enemies will tread. Active explosions will trigger inactive grenades, resulting in collateral damage.
Rocket Launchers are dangerous to use indoors. I suggest that if you plan on using one, you keep a safe distance. You can lure enemies behind doors, where you can blast them on the other side with a well-placed rocket shot.
Of course, always be careful while using any explosive. They can deal extreme amounts of damage to you if thrown too close, or held onto for too long.
Spears - When all else fails, your trusty spear will do the trick! Spears can still keep enemies at bay with their long attack range, while dealing decent damage. Only throw your spear if you have a good angle, or very good aim. Tossing your only melee weapon away can screw you over, especially outdoors. For that reason, aim your spears towards the ground. Hitting a zombie's legs or torso can stun them, giving you a chance to get some breathing room.
Surviving
The perk Animal Tracker helps greatly in finding animals to kill and eat. Once ranking it up, crouch for a few seconds to reveal the locations of all animals in a radius. Apart from that, Perception builds rely on looting and scavenging for food/water. With perks such as Lucky Looter and Lock Picking, you're likely to find what you're looking for, without much trouble getting inside.
Obtaining resources is best done through the perk Salvage Operations. Traverse the area, looking for salvagable devices, to help find core materials such as brass, lead, and iron. Many items you salvage, such as radiators, batteries, and engines, can readily be scrapped or incinerated for its respective raw material.
Blood Moons
Early game, you're likely starting out with just a hunting rifle, and perhaps a few molotovs or pipe bombs. Because early hordes aren't the biggest threat, you shouldn't have any significant problems. Use your hunting rifle, go for headshots. When enemies stack up, toss in a pipe bomb or two.
When late game comes, and hordes are more intense, you have a wider selection of options to choose from.
Use your sniper rifle to pick off as many enemies as you can. If you have Dead Eye ranked up, go for weak enemies first to build up a quick killstreak, and then target higher health enemies. Try your best to take out high-priority targets. Typically, Demolition zombies and Fat Cops should be taken out as soon as possible, as they have the most potential to ruin your base.
When enemies bunch up, obliterate them with explosives. Later game, you have better choice weaponry for explosives, such as contact grenades. If you want to stack extra explosive damage, throw inactive grenades and trigger them with an active one. This easily wipes out hordes of enemies, but the toughest may survive.
Place landmine traps. As you level up Demolitions Expert, you will unlock recipes for several explosive traps. Craft and plant some around your base to clear out a few groups.
Rocket launchers can be used for high-priority targets. Rocket Launchers do insane amounts of damage, especially upon direct hits. When in dire need to kill a dangerous enemy, use your RL to quickly take them out. Do not use explosives against the Demolitionist zombie! It will immediately trigger their C4. Rockets launchers can also be used to clear hordes if not too close.
Skilltree Synergies
What perks mix best with Perception?
Because of how Perception builds play, Agility is one of the best skilltrees to mix with Perception, if you plan on going full combat.
Previously, I mentioned vantage points and their usage for taking out enemies. Because the stealth mechanic is valuable for this, as it allows you to remain undetected, Hidden Strike and From the Shadows are excellent perks to pick up, as they improve your stealth damage and decrease detection risk. Stacking stealth damage upon the already massive damage of rifles results in one-shotting just about anything that moves.
Parkour can also help reaching new vantage points, as it increases jump height.
When it comes to the best armor type for Perception builds, I recommend light armor. For the exact same reason, its a good idea to pick up Light Armor in the Agility tree.
Alternatively, if you have completed the Sniper series, you can craft Ghillie Suits. If you enjoy staying hidden and sniping threats from afar, Ghillie Suits will become your best friend. They decrease noise and visibility. Combined with stealth perks from Agility, it is possible to become completely invisible.
As for every build, I recommend picking up Mother Lode, Sexual Tyrannosaurus and Miner 69'er from the Strength tree. These perks are extremely good for early game progression, and will help you immensely in gathering the main resources you need.
No comments:
Post a Comment